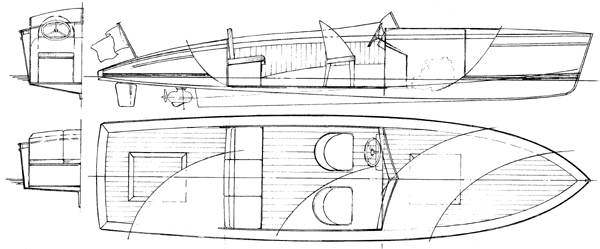
Windsor Slipper Launch


Home
Windsor Slipper Launch
Fanny the Fantail Launch
14' Morning Tide
20' Skipjack

SELWAY FISHER MODEL BOATS
(formerly makeamodelboat.com)

CONSTRUCTING THE WINDSOR SLIPPER LAUNCH


The Balsa frame components - note that the Datum WL is marked on all pieces. Not included above is the pair of breast hooks used to form the gunwale curve at the bow.
The girder cut ready to take the stern tube.
Take your time and make sure that the stern tube is glued exactly in line with the girder - the easiest way it epoxy the tube to the lower part of the girder using tape to hold it in position whilst the epoxy cures.
Before cutting the girder, vertical lines were drawn making it easier to correctly line up the top part with the bottom part. If you try to glue both parts of the girder together with the tube at the same time it is easy for the girder to end up misaligned.
Whilst gluing the top part of the girder to the tube, all components were supported to keep the tube clear of the work surface and held in place by weights - don't rush this part of the assembly.
For the hole to take the rudder tube, the doubler was glued to one side of the girder before it was cut. Once the glue had cured, the girder was cut and then the second doubler added to the other side - this ensured that the aft part of the girder was kept exactly in line with the rest of the girder.
The frames glued to the girder in typical egg-box fashion. Make sure that the frames are all vertical, square to the girder and that the Datum WL corresponds on each component. Note the breast hook pieces at the bow cut ready to accept the gunwale stringers.
Blocks have been pinned to the frames to stiffen up the framework before fitting the stringers. Some builders would support each of the frames off a building base to make sure everything is rigid and in the correct position.
The gunwale and chine stringers are each made up from 4 pieces 3x3mm Balsa - the first of the 4 for the starboard gunwale stringer has been glued in position.
Keep everything equal so that when you glue part of a stringer in place on one side you immediately do the same with the other side - here the gunwale stringers are complete and the chine stringer has been started.
The framework complete with all edges beveled ready for planking.
Before planking the motor and shaft assembly was fitted - it is much easier to cut out the hole through Frame B and cut out the top of the girder before the plank is fitted.
The first part of the planking fitted - the planking is 3mm sheet rather than the 1.5mm mentioned on the drawings - although slightly more difficult to fit around the curves of the hull near the bow, it makes for a more robust hull.
Towards the bow, the planking was fitted with vertical grain making it easier to bend into place.
Once the glue had cured on the bottom planking, the edges were beveled ready for the topside planking.
The planking towards the transom is trimmed and then the outer transom is glued in place.
The hull planked and ready for finishing.
Note the outer transom has been rounded. The next stage is to seal the Balsa planking - I will use Sanding Sealer and then cover the hull with lightweight tissue and Dope. The hull will then be painted before finally fitting the hardware - more photos coming soon.
Sorting out the position of the radio control gear and batteries - George the helmsman makes an appearance!
The batteries will be 8 x AA batteries in 2 boxes ( I used PN 57201 low channel receiver boxes from Cornwall Model Boats wired in parallel) - the receiver and electronic motor control will be mounted under the aft bench seat.
The seating compartment was made in one removable unit.
The seat compartment and aft hatch upside down - the aft bench seat is shaped to accommodate the receiver and electronic motor control.
Making a card template for the shape of the windscreen - the windscreen itself is cut from scrap acetate packaging and glued in place with epoxy.
Almost finished and George is sitting comfortably.

A view onto the aft end - George ought to be decked out in striped blazer and boater to look the part on the Thames!

Order the Windsor Slipper Launch Model Plans

Use the upper Buy Plan Button if you want printed plans (postage will be added - see postage costs at bottom of page).

Use the lower Buy Plan Now Button if you want the PDF plan emailed to you (no postage added).

WINDSOR SLIPPER LAUNCH MODEL PLANS COST 

UK/EU/US/Elsewhere - FULL PLAN £12          

UK/EU/US/Elsewhere - FULL PLAN £12          

(Approx. 13 Euros/$16 USD)


Ordering Model Boat Plans

 We are now offering our plans either as printed plans sent by post or as PDF files which are emailed to you.

 The printed plan price excludes postal charges, which will be added to the plan price when the charge is made to your debit/credit card.

 For those wanting the plans printed and posted to them the postal charges are:

 UK - £2: EU - £9; USA - £13; Elswhere - £3.